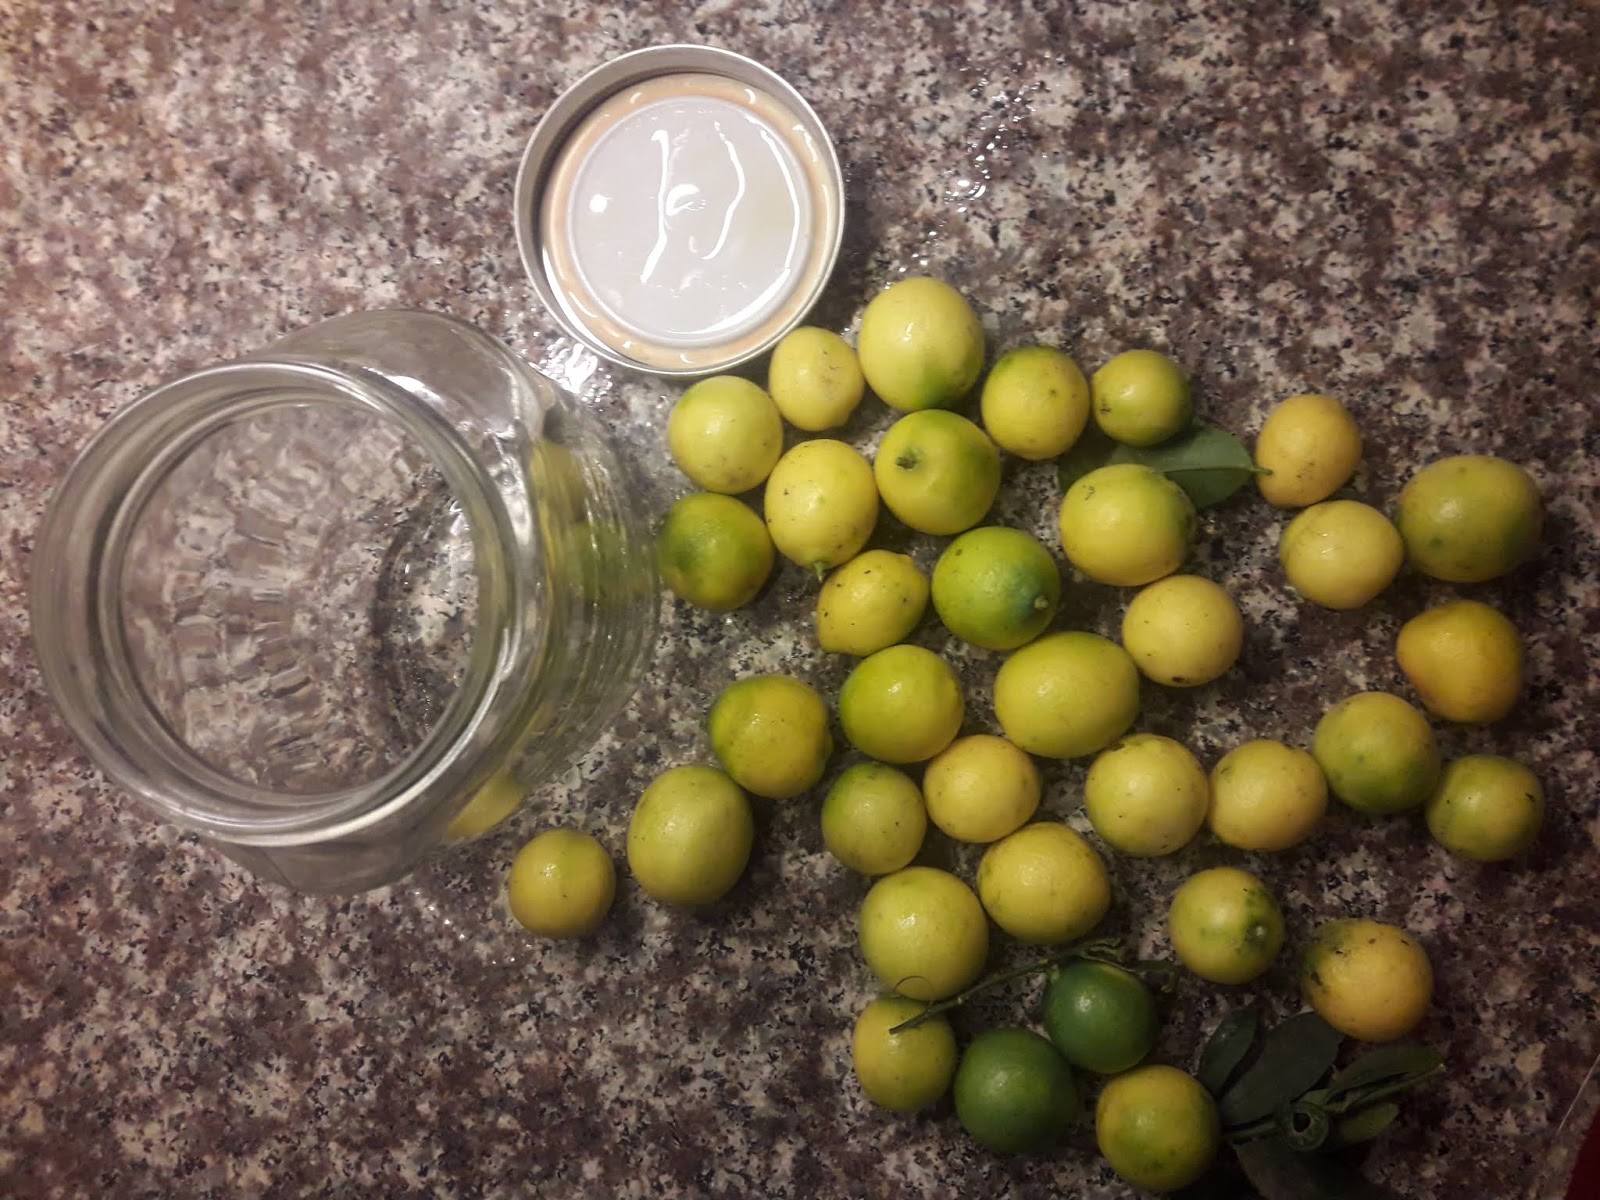
Tiny lemons season.
Wash lemons and jar
Cut in halves. Rub/dip in salt and pack into jar.
No water necessary. Just let time do it's work. Slowly the lemon juices will ooze out and dilute the whole mixture. The jar will soon be steeped in it's own syrup ready for consumption.
I usually discard the "flesh" inside and with sissors just snip the wonderfully pungent, spiky lemon zest into small splinters, straight on to sandwiches, salads, any foods that need an extra oomph to give it life. Enjoy
Showing posts with label Appetizers. Show all posts
Sunday, July 12, 2020
Preserved lemons
Labels:
Appetizers,
Breakfast,
Camping,
Food Gifts,
Pickles,
Picnics,
Preserving,
Vegan,
Veggies
Cured FIsh - Palamyda
Cover filleted fresh raw fish with home-made curing mix
a) I had plenty of lemons
b) This second fish seem a bit dry so I wanted to cover it. The original recipe called for sliced oranges but its not orange season. Anyways I had lots of lemons in the kitchen🍋
Cover in cling film to prevent drying
Make sure you tilt the plate so the juices run down and drains away.
Glorious home cured palamyda! After only 24 hours ready - Yum!
Notice how the juice runs down because the plates are tilted at an angle.
No space on the counter top or fridge!
Don't worry the lemons did not give the fish an overpowering citrus taste. I DID remove the lemons after an overnight soak. I was afraid it would make a cerviche before I was ready.
Served with thinly sliced onions, chopped coriander and salt
I was quite surprised how red the flesh was, I was expecting it to be more white.
Nevertheless, the taste was amazing. Not fishy, not salty, just a smooth, silky fragrant softness.
Perfect! Not too salty, subtly flavoured with the cloves and anise adding an aromatic enigma to the silky, translucent delight.

Curing Mix
Carraway seeds,
Anise star
Sugar,
Salt coarse
Corriander seeds
Lemongrass
Cloves
Bay leaf

So freakin good here!
So a small tub costs 20 nis at the open food market (Avi's - Shuk Ha Carmel)
I bought from Yaffo 3kg / 100 nis (3 large fishes)
which roughly makes about 18 tubs (18 x 20 = 360 nis)!!!
Note: I did not like the mix with sugar that I use for curing salmon. The pure salt mix worked better for Palamyda.

Beautifully translucent with a shiny silkiness, slippery, glides effortlessly down your palate. The aroma of cloves and anise is wonderfully divine here.
Served on thinly chopped onions and coriander mixed with salt. Perfection!
Labels:
Appetizers,
Breakfast,
Fish,
Food Gifts,
Pickles,
Picnics,
Preserving
Monday, October 21, 2019
Pickles!! Okra
Nothing beats the crunchy spicy bite of a homemade pickle okra
Just use what you already have in the kitchen. I had chili flakes (I always have chili flakes)
black mustard seeds, coriander seeds, all spice, sliced or crushed fresh garlic, bay leaves and super hot Thai chilis.
2. Add spices you have in hand ie: mustard seeds, black pepper seeds, lemon zest,
black mustard
seeds, coriander seeds, allspice, sliced or crushed fresh garlic, bay leaves, chilis
3. Dissolve 1tsp of salt in 1/2 cup of hot water. Leave to dissolve.
Then fill with cold water to top of cup.
4. Pour cold salty water in to the okra jar till 3/4 full.
5. Top with vinegar to make a ratio of 3/4 salty water and 1/4 vinegar.
6. Close tightly lid and leave to pickle.
The water will start to get cloudy and the okras will change from a bright green to a dull khaki colour.
They should be ready to eat after a week (depending on the climate)
If you want to slow the process. Often I open a jar and want to eat the other jars for later, I just put them in the fridge for later. Easy peasy.
Pickle party!
Crunchy heaven!
Then fill with cold water to top of cup.
4. Pour cold salty water in to the okra jar till 3/4 full.
5. Top with vinegar to make a ratio of 3/4 salty water and 1/4 vinegar.
6. Close tightly lid and leave to pickle.
The water will start to get cloudy and the okras will change from a bright green to a dull khaki colour.
They should be ready to eat after a week (depending on the climate)
If you want to slow the process. Often I open a jar and want to eat the other jars for later, I just put them in the fridge for later. Easy peasy.
- Benefits:
Potassium, vitamin B, C, folic acid, calcium
Low in calories, high in fibre. - Contains beneficial antioxidants. Okra packs many antioxidants that benefit your health. ...
- May lower heart disease risk. ...
- May have anticancer properties. ...
- May lower blood sugar. ...
- Beneficial for pregnant women. ...
Pickle party!
Crunchy heaven!
Labels:
Appetizers,
Camping,
Food Gifts,
Gluten-free,
Pickles,
Picnics
Friday, September 14, 2018
Picked cucumbers
4 trays 20 nis (5 nis per box)
Super small and cute
End of the day Friday - shuk Ha carmel
salt dissolved in a cup of boiling water
When all dissolved, add cold water.
Wait to completely cool.
Pour in jars.
Seal.
Optional: add garlic, dill, chili, black pepper...sky's the limit :)
Ready in a few days.
I have long since stopped buying preserving jars, all these are jars whose contents were fully savoured, beautiful glass jars spared from the bin. Re-cycled to a new and useful life for family and friends to enjoy. :)
Labels:
Appetizers,
Food Gifts,
Preserving,
Shuk
Friday, November 24, 2017
Gluten free Bread
Noreen's Recipe (Recipe No. 1)
3 cups White Rice flour
3 cups Topica flour
3 cups glutinous rice flour (original recipe with sweet rice)
3 Tbps of Xanthan gum
I always have a big bag prepared all ready to go.
Bread Recipe
1 1/4 cup warm milk/ soy milk
1/4 cup ( 4 Tbps) cup sugar
25 gr (1 cube) 2 1/4 yeast - (best use very fresh vacuum or fresh yeast - test still active)
50 gr (1/4) melted butter
2 Eggs
1 tsp Vinegar
2 1/2 cup of GF flour
1 1/2 tsp Xanthan Gum
1/2 cup Flax
1 tsp Salt
Walnuts optional
Pre-heat oven 250c
Dry Flour Mix:
Add freshly ground Flax, Xanthan gum , GF flour, Salt
Yeast Mix:
Microwave milk, butter until melted. Stir.
Dust with flour once bread is cooled
Best to cut when chilled as much as you can resist.
It rose really nicely

Baked too.
But as it cooled it flattened a bit.

Crumb is spongy and nice. A tad wet for me, hubby loved it.
Finally bread!!
The flax was pretty and gave a nice look and taste.


Recipe No. 2 (good)
Basically, add all dry ingredients
Warm milk with sugar in microwave
Add FRESH yeast and ferment.
Whisk eggs
Add wet ingredients to dry and mix, knead for full 10 mins.
Add walnuts at the end.

TIP: To speed up the rising I rest the bread tin in a tray of boiling water.
This really hastens the rising time.
The crumb is actually very nice and "bready" Slightly moist on the bottom as in the pic. but I didn't notice it when eating and certainly didn't affect the taste.

TIP: To speed up the rising I rest the bread tin in a tray of boiling water.
This really hastens the rising time.
Between recipe 1 and 2 little difference. Both very good bread
Left no.1 (Noreen's) Right no. 2
The left is much browner because I'd added one cup of grounded flax seeds.
Bread no.3
This recipe used psyllium no xanthum gum
Failure:
The dough felt good and firm, much like a regular gluten bread which made me think maybe this is not correct?

Didn't rise at all.
But baked anyways, one last try before trashing it.


Ugh. Happens.
This recipe used psyllium.
Noreen's (Recipe No.1)
My Gluten mix (Recipe No.2)
Discovery
The dough should be wetter and softer than regular dough bread. So don't be afraid adding all that liquid.
You cannot knead GF bread in the traditional sense. It's too sticky. I use an electric hand mixer with bread hooks for about 8 mins.
Most times I put a tray of water on the bottom shelf of the oven, supposed to give a crunchier crust.
GF bread I'm told should only be cut into when cold. Never when still hot.
Didn't find much difference between 1 and 2. They are both very tasty and bread-like
Update
Recipe No. 4
The weirdest recipe I admit but it worked!
Note the price just 6 nis! for gluten-free bread?
I was challenged as I was disgusted by the 28 nis price tag for sorghum.
Recipe on the back of the bag:
1kg GF Flour
50g Fresh Yeast
4 Eggs
60gr Butter (melted)
3 tbsp Date Syrup (weirdish in a nice way..)
3 tbsps Tahina - (weird but OK)
600 ml lukewarm water
1/2 tsp salt
1 tbp of sugar (my addition to the yeast
Warm sugar, water, date syrup, butter, in the microwave.
Add fresh yeast.
Leave to ferment.
Add tahini
Flour mix:
Combine GF flour, salt.
Add proofed yeast mix. Knead with hooks for 8 mins.
In the last minute add walnuts or seeds etc.,
Place in lined tin and leave to prove. This bread did not prove very high, but when it went in the oven it skyrocketed! Sorry for the blurry photo, clearly my hand was shaky from the monster coming out of the oven.
Looks and feel like very "real normal" bread.
Couldn't wait to cut and taste it, but had to wait till cool'ish" Gluten-free bread are notorious in collapsing when cut still hot.
Nice crumb, but tasted like supermarket bread. That is no taste.
I wanted to stay true to the recipe the first time making it. Honestly, I didn't think this recipe and flour at 6 nis a pack would deliver! But wow what a height it grew.
Flavour needs working on. Next time will add flax seeds and walnuts etc to pack some bite.
Great tip: Always keep frozen GF breadcrumbs in the freezer.
Easy dessert just became a no-brainer.
Grab whatever fruit that's going soft in the fridge.
Cut, toss in cornflour.
Whip out frozen breadcrumbs, add cornflakes, desiccated coconut, walnuts, treacle, butter, (optional sugar)
Gluten-free topping done!
Recipe for GF fruit crumble - Click Here
Noreen's Recipe (recommend)
Flour mix:
3 cups if Sorghum flour (I've used oat flour (blended oats) instead of Sorghum - worked fine)3 cups White Rice flour
3 cups Topica flour
3 cups glutinous rice flour (original recipe with sweet rice)
3 Tbps of Xanthan gum
I always have a big bag prepared all ready to go.
Bread Recipe
1 1/4 cup warm milk/ soy milk
1/4 cup ( 4 Tbps) cup sugar
25 gr (1 cube) 2 1/4 yeast - (best use very fresh vacuum or fresh yeast - test still active)
50 gr (1/4) melted butter
2 Eggs
1 tsp Vinegar
2 1/2 cup of GF flour
1 1/2 tsp Xanthan Gum
1/2 cup Flax
1 tsp Salt
Walnuts optional
Pre-heat oven 250c
Dry Flour Mix:
Add freshly ground Flax, Xanthan gum , GF flour, Salt
Yeast Mix:
Microwave milk, butter until melted. Stir.
Add Sugar. Dissolve.
Add Yeast. Stir well. Leave to ferment. (see note below)
Add liquid to Flour mix.
Mix slightly.
Add Eggs, mix.
Add Vinegar,
Add walnuts or whatever additions: ie. dried Tomatoes, Olives etc., at this stage.
Incorporate into the dough.
Knead with bread hooks for a good 8 mins. (unlike gluten regular bread, GF is sticky too knead)
The oven should be preheated to 250c.
Place bread on the middle shelf.
Continue baking at same temperature. Check after 10 mins if the top has brown enough.
Cover with aluminium foil to protect and continue baking till done. (Done = tap on bread all sides for hollow sound)
Optional: Place tray with water underneath ( they say for a crisper hard crust).
*Note use a big enough bowl to allow yeast to grow and not overspill.
Watch carefully for it to ferment. It could foam very fast.
(Trick: Bain Maire it in boiling water from the kettle to accelerate the fermenting)
Once proof the yeast is working quickly
Tip:
To speed up the rising I rest the bread tin in a tray of boiling water.
This really hastens the rising time.
Add Yeast. Stir well. Leave to ferment. (see note below)
Add liquid to Flour mix.
Mix slightly.
Add Eggs, mix.
Add Vinegar,
Add walnuts or whatever additions: ie. dried Tomatoes, Olives etc., at this stage.
Incorporate into the dough.
Knead with bread hooks for a good 8 mins. (unlike gluten regular bread, GF is sticky too knead)
The oven should be preheated to 250c.
Place bread on the middle shelf.
Continue baking at same temperature. Check after 10 mins if the top has brown enough.
Cover with aluminium foil to protect and continue baking till done. (Done = tap on bread all sides for hollow sound)
Optional: Place tray with water underneath ( they say for a crisper hard crust).
*Note use a big enough bowl to allow yeast to grow and not overspill.
Watch carefully for it to ferment. It could foam very fast.
(Trick: Bain Maire it in boiling water from the kettle to accelerate the fermenting)
Once proof the yeast is working quickly
Tip:
To speed up the rising I rest the bread tin in a tray of boiling water.
This really hastens the rising time.
Noreen's 1st time
Best to cut when chilled as much as you can resist.

But as it cooled it flattened a bit.

Crumb is spongy and nice. A tad wet for me, hubby loved it.
Finally bread!!
The flax was pretty and gave a nice look and taste.


Recipe No. 2 (good)
Bread Flour Mix
Millet flour – 2 cups
Sorghum flour – 1 cup
Cornstarch – 1 cup
Potato starch (not potato flour) – 1 cup
Tapioca starch (als0 called tapioca flour) – 1 cup
Total = 6 cup
Millet flour – 2 cups
Sorghum flour – 1 cup
Cornstarch – 1 cup
Potato starch (not potato flour) – 1 cup
Tapioca starch (als0 called tapioca flour) – 1 cup
Total = 6 cup
1 cup plus 3 tablespoons skim or 1 or 2% milk (or milk substitute) (110º F)
1/4 cup Canola oil2
large eggs (room temperature
2 2/3 cups Bread Flour Mix
1/2 cup Flax seeds
3 tablespoons sugar
2 1/4 teaspoons xanthan gum
1 1/2 teaspoons unflavored gelatin
3/4 teaspoon salt
Cube of FRESH yeast 25gr or 50gr?
3/4 cup chopped walnuts - (optional) I recommend love walnuts lots of Omega 3
Basically, add all dry ingredients
Warm milk with sugar in microwave
Add FRESH yeast and ferment.
Whisk eggs
Add wet ingredients to dry and mix, knead for full 10 mins.
Add walnuts at the end.

TIP: To speed up the rising I rest the bread tin in a tray of boiling water.
This really hastens the rising time.
The crumb is actually very nice and "bready" Slightly moist on the bottom as in the pic. but I didn't notice it when eating and certainly didn't affect the taste.
Made Noreen's (No.1) 2nd time around with walnuts

TIP: To speed up the rising I rest the bread tin in a tray of boiling water.
This really hastens the rising time.
Between recipe 1 and 2 little difference. Both very good bread
Left no.1 (Noreen's) Right no. 2
The left is much browner because I'd added one cup of grounded flax seeds.
Bread no.3
This recipe used psyllium no xanthum gum
The dough felt good and firm, much like a regular gluten bread which made me think maybe this is not correct?

Didn't rise at all.
But baked anyways, one last try before trashing it.


Ugh. Happens.
This recipe used psyllium.
Noreen's (Recipe No.1)
My Gluten mix (Recipe No.2)
Discovery
The dough should be wetter and softer than regular dough bread. So don't be afraid adding all that liquid.
You cannot knead GF bread in the traditional sense. It's too sticky. I use an electric hand mixer with bread hooks for about 8 mins.
Most times I put a tray of water on the bottom shelf of the oven, supposed to give a crunchier crust.
GF bread I'm told should only be cut into when cold. Never when still hot.
Didn't find much difference between 1 and 2. They are both very tasty and bread-like
Update
Recipe No. 4
The weirdest recipe I admit but it worked!
Note the price just 6 nis! for gluten-free bread?
I was challenged as I was disgusted by the 28 nis price tag for sorghum.
1kg GF Flour
50g Fresh Yeast
4 Eggs
60gr Butter (melted)
3 tbsp Date Syrup (weirdish in a nice way..)
3 tbsps Tahina - (weird but OK)
600 ml lukewarm water
1/2 tsp salt
1 tbp of sugar (my addition to the yeast
Warm sugar, water, date syrup, butter, in the microwave.
Add fresh yeast.
Leave to ferment.
Add tahini
Flour mix:
Combine GF flour, salt.
Add proofed yeast mix. Knead with hooks for 8 mins.
In the last minute add walnuts or seeds etc.,
Place in lined tin and leave to prove. This bread did not prove very high, but when it went in the oven it skyrocketed! Sorry for the blurry photo, clearly my hand was shaky from the monster coming out of the oven.
Looks and feel like very "real normal" bread.
Couldn't wait to cut and taste it, but had to wait till cool'ish" Gluten-free bread are notorious in collapsing when cut still hot.
I wanted to stay true to the recipe the first time making it. Honestly, I didn't think this recipe and flour at 6 nis a pack would deliver! But wow what a height it grew.
Flavour needs working on. Next time will add flax seeds and walnuts etc to pack some bite.
Great tip: Always keep frozen GF breadcrumbs in the freezer.
Easy dessert just became a no-brainer.
Grab whatever fruit that's going soft in the fridge.
Cut, toss in cornflour.
Whip out frozen breadcrumbs, add cornflakes, desiccated coconut, walnuts, treacle, butter, (optional sugar)
Gluten-free topping done!
Recipe for GF fruit crumble - Click Here
Labels:
Appetizers,
Breads,
Breakfast,
Dinner Parties,
Food Gifts,
Freezer,
Gluten-free,
soups
Saturday, June 3, 2017
Capers pickling
In abundance! Little wonder the thorns here is one of Natures on-Prozac nastiest deterrent...almost
Original recipe - Click here
Changed water every day for about a week. There was a odor each time the lid was opened, but this was fine and as should be. So don't worry. Capers gradually changed colour from vibrant green to a khaki colour and the water is slightly scarlet.
Ready for tasting.
Delicious, stalks and all. Even the ones that opened slightly to a flower, My favourites were the tiny ones, Worth all the pain against those vicious hooks on the caper bush.
Labels:
Appetizers,
Breakfast,
Camping,
Dinner Parties,
Food Gifts,
Preserving,
Veggies
Subscribe to:
Posts (Atom)


